In the charming villages of the Netherlands, and later in Dutch communities in the US, a unique door style emerged that was far more than just a gateway between the inside and the outside. At first glance, you might see what appears to be a standard door, but look a little closer and you’ll realize that it’s actually two doors in one — you’re witnessing the greatness of Dutch doors!
Top half open, it invited the sunshine and fresh air inside. Bottom half closed, it offered the security of a traditional door, keeping farm animals out and children and pets safely inside. Fast forward to today, and Dutch doors have transcended their local origins, offering a blend of practicality and aesthetic appeal that fits as well in a Manhattan apartment as in a countryside home!
No wonder their dual nature has caught the eyes of homeowners and designers alike. With a Dutch door, you not only get the comfort of a door and the openness of a window but also a multifunctional feature that serves for ventilation, security, and style all rolled into one.
From Dutch door ideas to installation tips, we’ve got you covered in this comprehensive guide! Think of it as your one-stop resource for everything related to Dutch doors. Time to dive deeper into how they can revolutionize the way you interact with your living space.
What is a Dutch-Style Door?
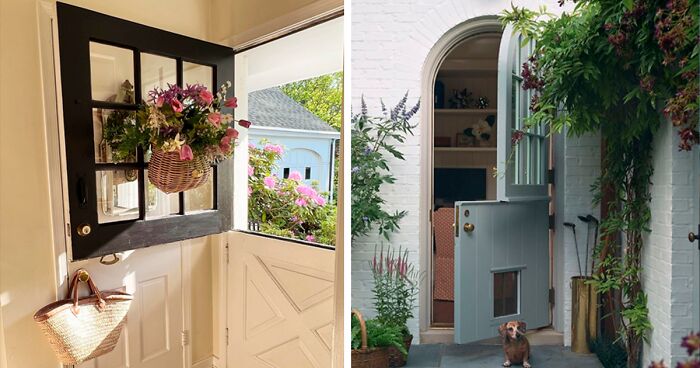
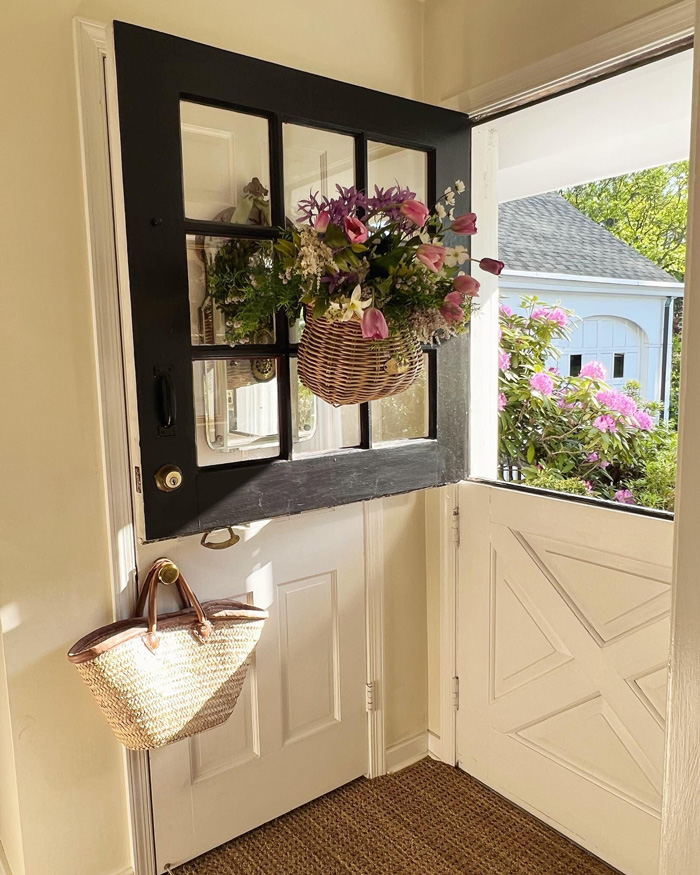
Image credits: studioflorence_
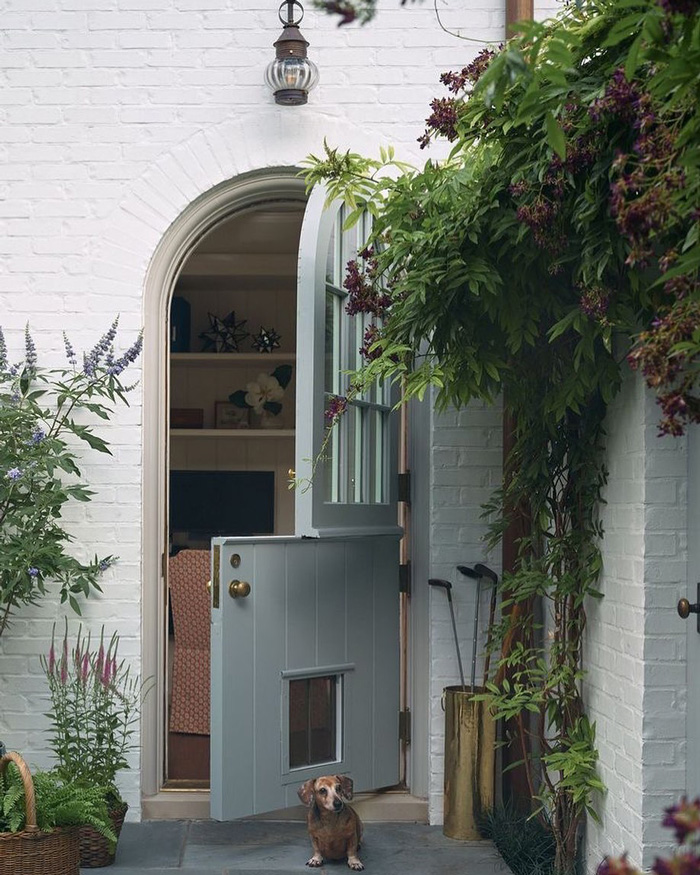
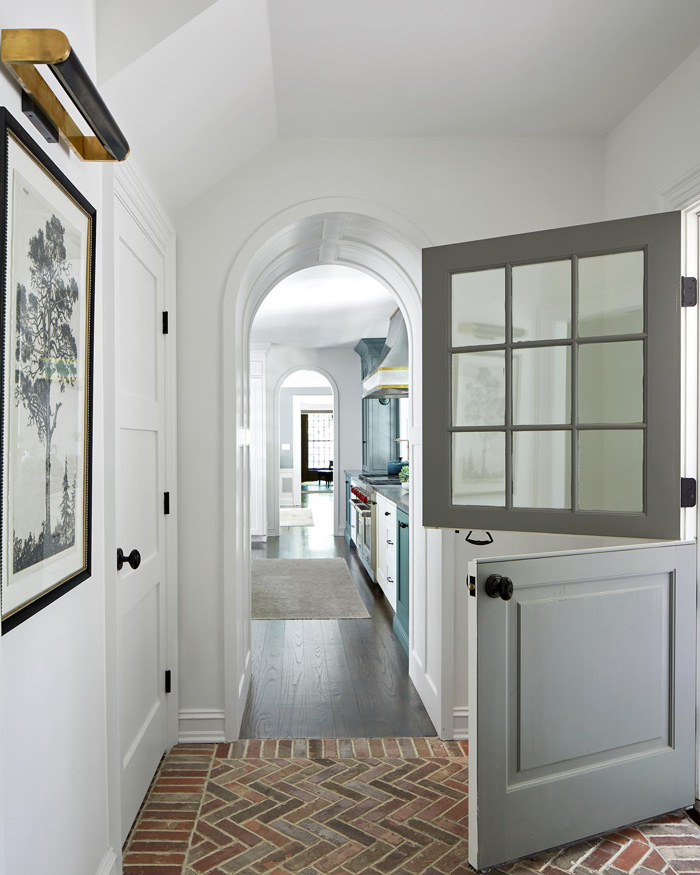
A Dutch-style door is characterized by its split design. Basically, instead of being one solid panel, the door is cut horizontally in the middle, creating an upper and a lower half. Each half can operate independently of the other. This means you can open the top half while the bottom half remains closed, and vice versa.
Dutch doors can come in both single and double door formats, widening their application from front entries to expansive patios or even room dividers.
What Are the Advantages of a Dutch Door?
Dutch doors are not just about looking pretty. They come with practical benefits that have contributed to their centuries-lasting appeal. Here are some key advantages of incorporating a Dutch door into your home:
- Efficiency: Dutch door designs favor ventilation and natural light, making a room feel more open and welcoming while also potentially reducing the need for artificial lighting or air conditioning.
- Safety and Security: The divided structure allows you to interact with visitors and neighbors or accept deliveries without fully opening the door. It also protects children and pets by preventing them from wandering where they shouldn’t.
- Aesthetic Appeal: Dutch doors add a unique architectural element to any space. Whether you’re going for a traditional, rustic look or a modern, minimalist aesthetic, there’s one that will match your personality. The door becomes a focal point, elevating the room’s overall design.
- Added Property Value: Their unique blend of functionality and style can increase the resale value of your home, making them a worthwhile investment.
Whether you live in a traditional farmhouse or a contemporary city loft, the advantages of a Dutch door are hard to overlook.
What Are the Downsides of a Dutch Door?
Flip the coin and you’ll find yourself with some aspects to keep in mind if you plan to install a Dutch door in your house. Let’s take a look at them:
- Cost: Given their custom design and added hardware, Dutch doors can be more expensive than their single-panel counterparts. This may deter some homeowners who are working on a tight budget.
- Maintenance: With more moving parts, including additional hinges, latches, and bolts, Dutch doors generally require more maintenance than standard doors to ensure they operate smoothly over time.
- Installation: Installing a Dutch door can be more complex due to the additional hardware and precise measurements required for the two panels to align perfectly. It’s often recommended to hire professionals, which adds to the cost.
- Sealing and Insulation: Because they are essentially two separate panels, Dutch doors may not offer the same level of sealing and insulation as a single-panel door.
Before committing to a Dutch door, it’s important to weigh these factors carefully. While they offer unique benefits, their specific drawbacks might make them less suitable for certain applications or lifestyles. Like any design choice, it’s about balancing the pros and cons to find what works best for you.
The Origin Story: Why Do They Call It a Dutch Door?
The Dutch door has roots that trace back to the 17th-century Netherlands. Traditional Dutch farmhouses consisted of living spaces that were closely integrated with areas for livestock and other animals. To separate these areas while allowing for light and air circulation, the Dutch door was invented.
Dutch settlers brought this door design with them when they arrived in America, particularly in areas of New York and New Jersey. Over time, they spread beyond Dutch communities, becoming the practical and popular door style we know and love.
What is the Difference Between a Dutch Door and a Stable Door?
There’s no substantial difference between Dutch doors and stable doors. These terms are often used interchangeably since their designs end up in the same kind of door — split into two halves, top and bottom, which can be opened and closed separately.
“Dutch door” is commonly used in the United States though, while “stable door” is more often found in the UK and other countries where British English is prevalent.
Interior Dutch Doors: Your Complete Guide (With Design Ideas)
While Dutch doors have historically graced exteriors, their application as an interior feature has gained substantial popularity, offering a fresh and inventive way to divide and design indoor spaces. Forget the old-school room dividers or the typical French doors — interior Dutch doors are where it’s at.
Kitchen and Dining Room
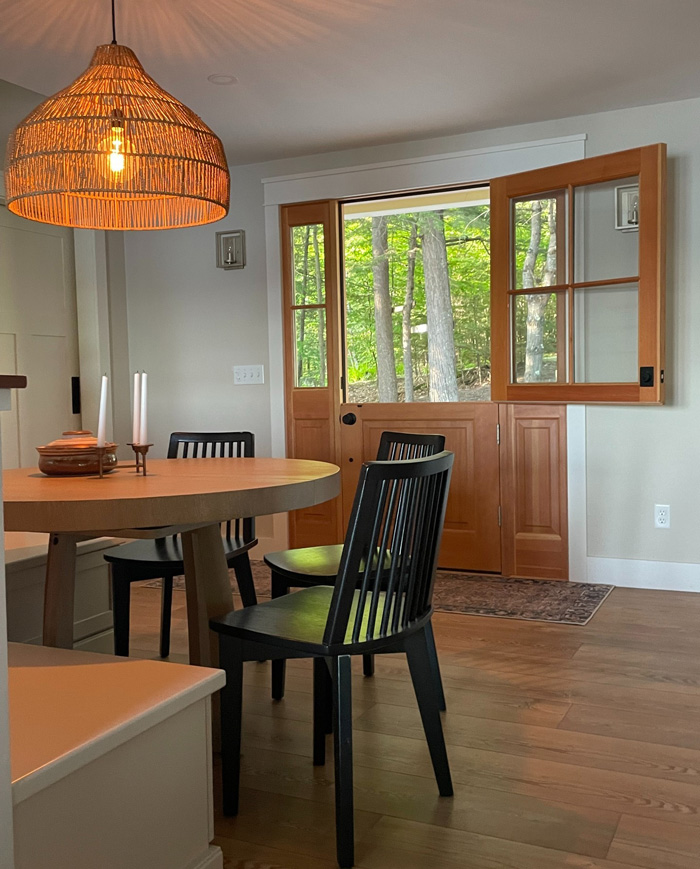
Image credits: simpsondoorco
Imagine a Dutch door separating your kitchen from your dining room. The top half opens up to allow the tantalizing aroma of a home-cooked meal to spread through the house, setting the ambiance for a cozy dinner — or stays closed to keep strong odors from dispersing to other rooms. Simultaneously, the bottom half can remain closed, keeping pets and little adventurers away from hot stoves and sharp utensils.
Home Office
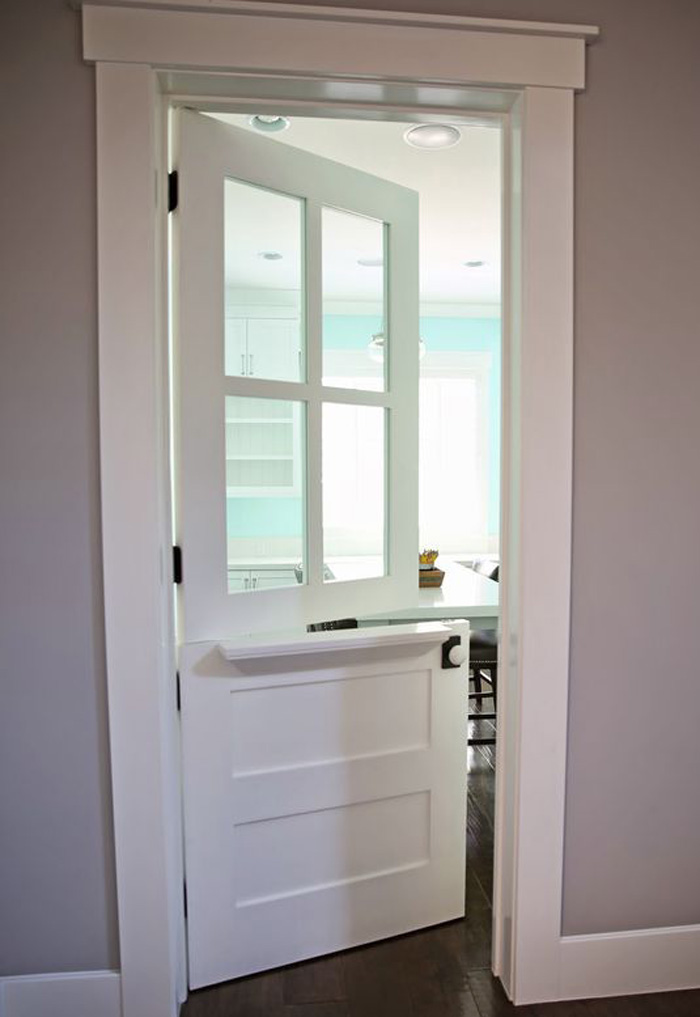
Image credits: Erin Sunny Side Up
Working from home? An interior Dutch door serves as a visual and physical indicator of your home office. Open the top half when you’re free for some conversation or need that natural light, and close it when you require focus and privacy. It’s a door and a “Do Not Disturb” sign all in one.
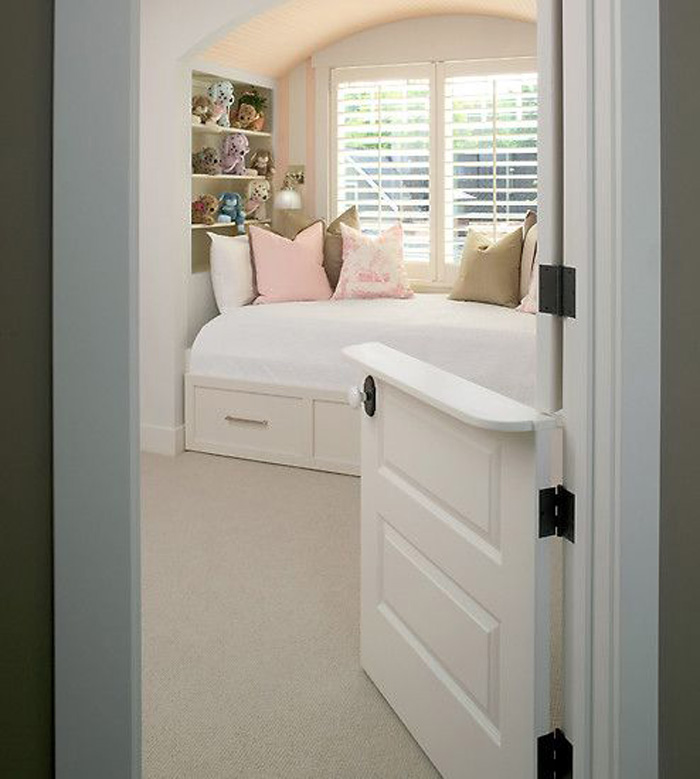
Children’s Bedroom
Image credits: houzz
For parents, an interior Dutch door to the children’s bedroom can be a game-changer, especially if there’s a baby. Keep the bottom half closed to maintain a secure environment for your kid, while the top half can be left open for easy monitoring without the risk of waking them up with a creaking door.
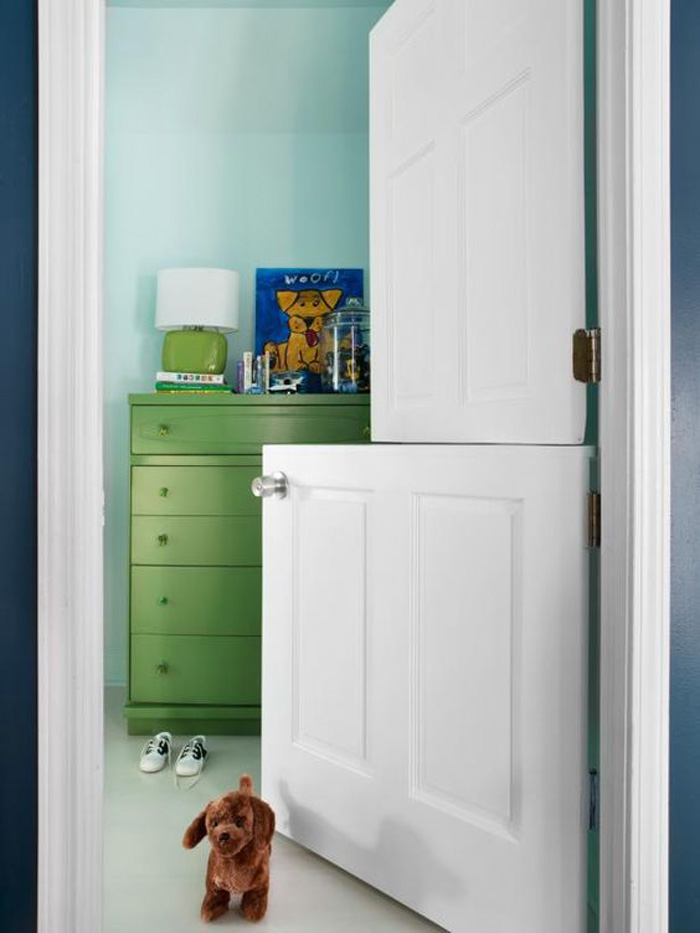
Master Bedroom
Image credits: hgtv
Want to turn your master bedroom into a bona fide suite? Use a Dutch door to separate the sleeping area from an en-suite bathroom or sitting area. With the top half open, you maintain the visual connection while being able to engage in separate activities in two spaces.
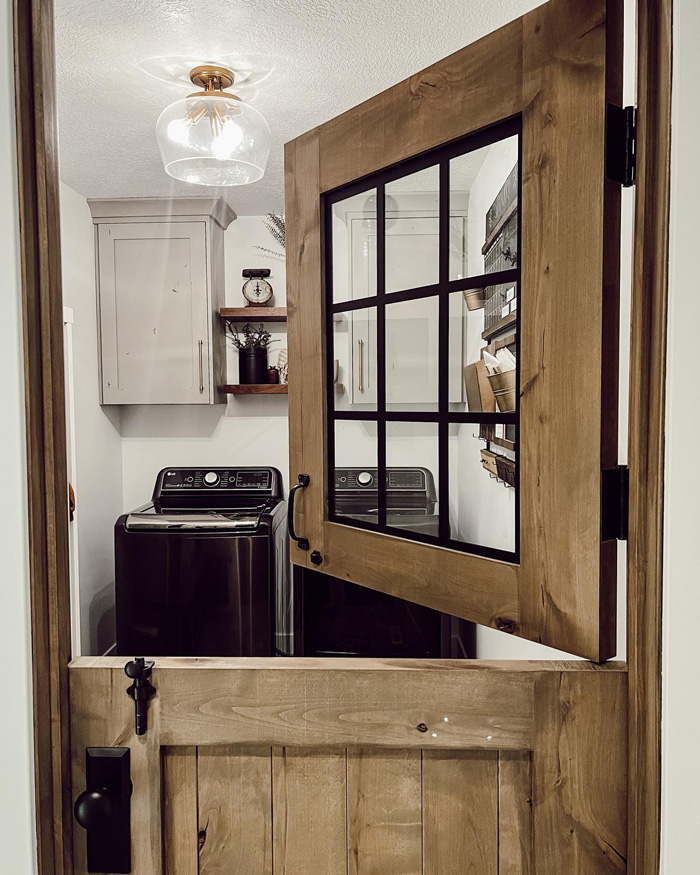
Laundry Room
Image credits: kenzie.dew.avenue
A Dutch door can seal off the laundry room while still allowing you to pass folded laundry through the top, making chores just a tad more bearable.
The pictures speak volumes, of course, but here’s the key takeaway: Interior Dutch doors offer a combination of style, functionality, and novelty that few other design elements can match. They redefine the concept of a “room with a view,” taking it quite literally.
Considerations
Before you rush to install an interior Dutch door, there are a few critical aspects to ponder. Here’s what you should keep in mind:
- Swing Direction: Consider which way the door will swing — into the room or out into the adjacent space. This can greatly affect the room’s functionality and should be decided before installation.
- Material: While hardwood is a common choice, other materials like fiberglass or metal can offer a different aesthetic and functionality. Choose according to your room’s specific needs and conditions.
- Acoustic: Unlike solid doors, Dutch doors usually don’t offer complete soundproofing, especially when the top half is open. Consider this if you’re planning to install one in a space that requires privacy.
Exterior Dutch Doors: Your Complete Guide (With Design Ideas)
When we think of Dutch doors, it’s easy to conjure idyllic images of cottages with picturesque gardens or elegant suburban homes. Yet, the allure of an exterior Dutch door goes beyond mere aesthetics; it’s also about creating a seamless blend between your indoor sanctuary and the great outdoors. Let’s unlock some inspiring use cases, shall we?
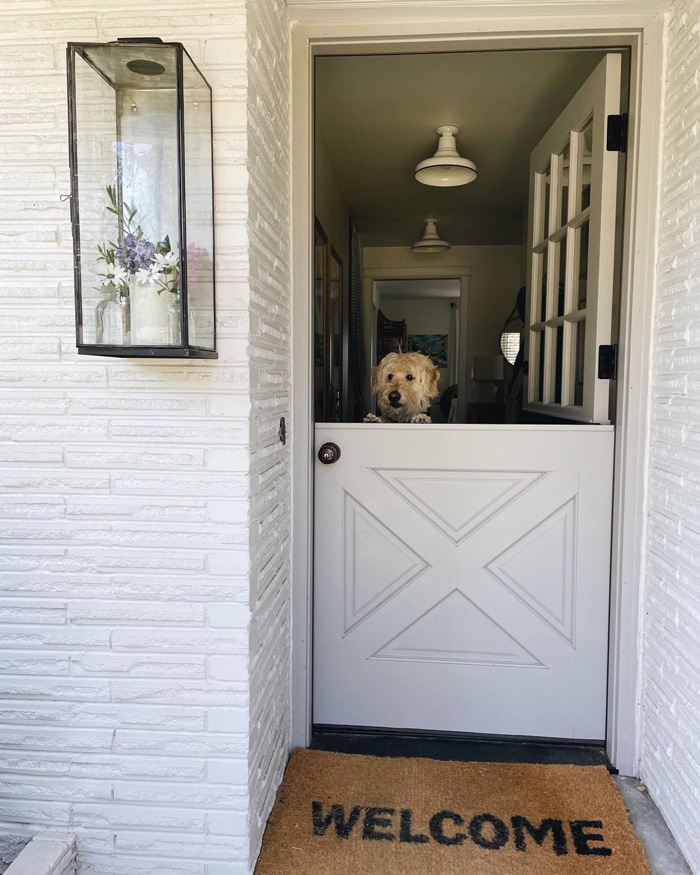
Dutch Front Door
Image credits: theinspiredroom
The first use is, no wonder here, a Dutch front door for your home’s entryway. The top half of your front entrance can be left open to greet guests and let in the summer breeze, while the bottom half remains securely locked, providing both hospitality and security.
Patio
Image credits: stonecottage2250
Instead of the typical sliding glass door, consider an exterior Dutch door that opens out to your patio or deck. It offers a quaint, inviting transition from inside to outside, perfect for al fresco dining or enjoying the sunset.
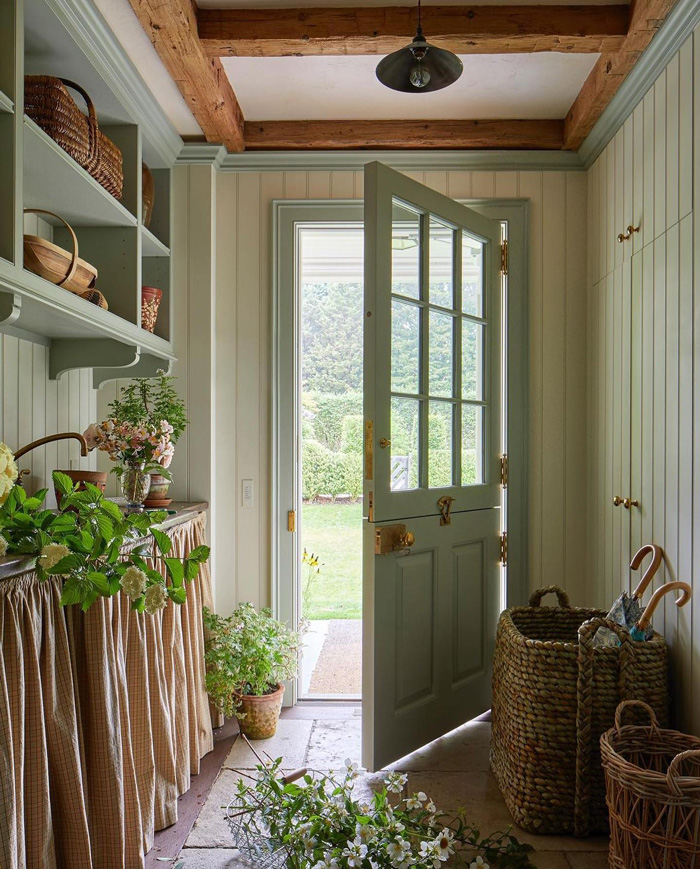
Mudroom
Image credits: katiearmour
For homes with mudrooms, an exterior Dutch door can be a godsend. Keep the bottom half closed to contain muddy boots or wet umbrellas, while the top half remains open for light and ventilation.
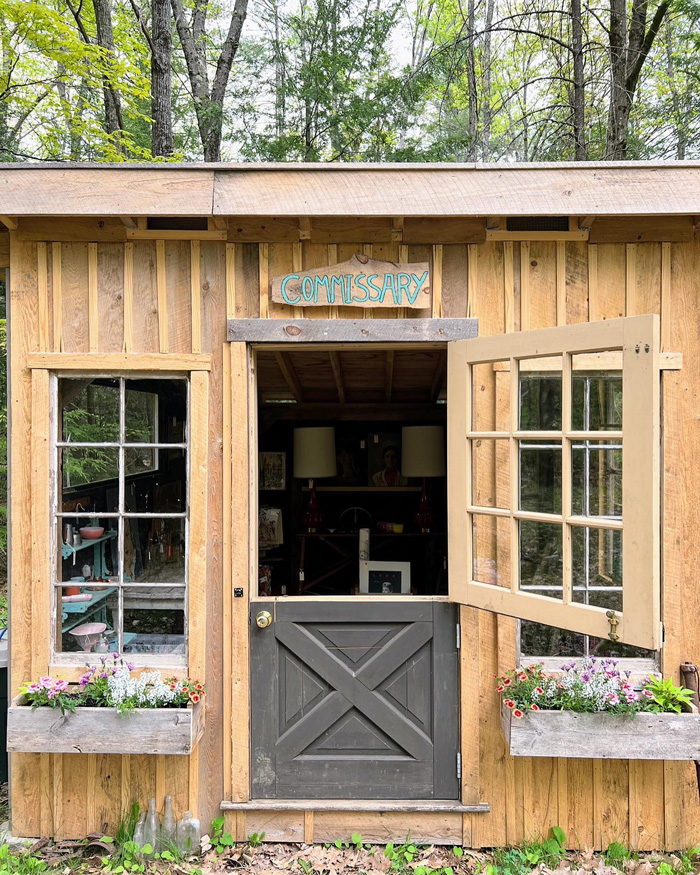
Garden Shed or Workshop
Image credits: thesecretaframe
Use a Dutch door to give your garden shed or workshop a functional and charming upgrade. The bottom keeps tools and materials out of the grasp of tiny hands, while the open top serves as a convenient hatch for passing through gardening tools or crafts.
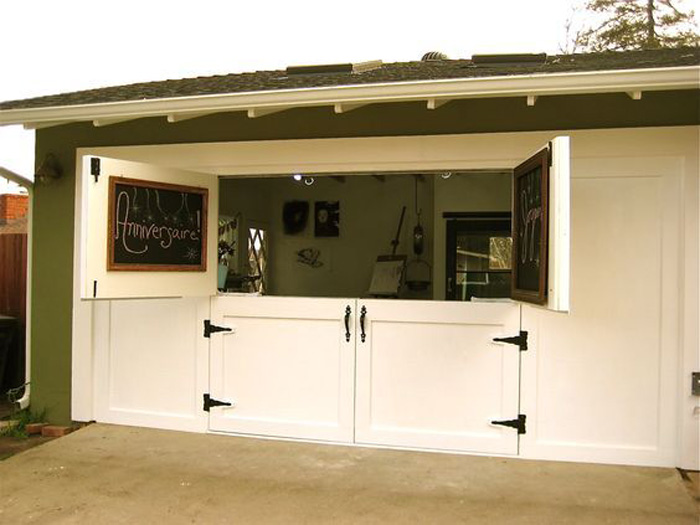
Garage
Image credits: Pinterest
Think outside the box — why not incorporate a Dutch door into your garage? Use the bottom half for security and the top half for ventilation when working on a project or simply to let in natural light.
Outdoor Kitchen
Image credits: michaelrobertconstruction
If you’re lucky enough to have an outdoor kitchen, a Dutch door can serve as a pass-through for dishes and food, adding a delightful and practical touch to outdoor gatherings.
Exterior Dutch doors are not merely an entrance or exit. They are an invitation to experience your home in a whole new way. By bridging your indoor and outdoor spaces with such elegance and utility, you’re stepping through an authentic piece of design that both your family and guests will love.
Dutch Door With Screen: How and Why
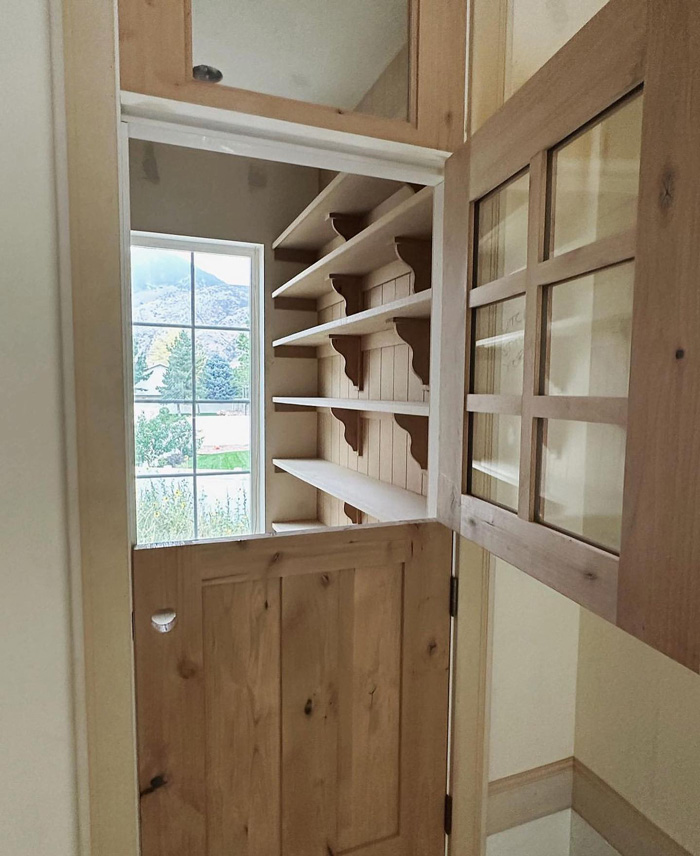
Image credits: murdockbuildersutah
The Dutch door is already an ingenious design, but add a screen to it, and you’ve got yourself the ultimate solution. One of the most compelling benefits of coupling your Dutch door with a screen is letting in the sweet scent of blooming flowers or the crisp autumn air without the downside of bees, mosquitoes, or flies entering your living space.
Enjoy your morning coffee with the top half open, allowing the dawn’s fresh air to circulate through your home, sans the bugs. Imagine those calm evenings when you want nothing more than to let the cool night air permeate your living room without the whining buzz of a mosquito breaking the peace. A screened Dutch door makes all this possible.
Considerations
The charm and utility of an exterior Dutch door make it appealing, but don’t overlook these essential factors:
- Weather Resistance: The material you choose for your exterior Dutch door needs to withstand the elements. Some options include solid wood coated with weather-resistant paint or a fiberglass composite, but we suggest you consult a professional so the door suits your region’s specific weather and climate.
- Security: Since the door is external, security becomes paramount. Invest in strong locks for both halves and consider adding a reinforced screen for an extra layer of protection.
- Energy Efficiency: Look for doors with good insulation properties to help regulate indoor temperature and lower energy bills. This is particularly crucial for exterior doors.
Why Are Dutch Doors So Expensive?
If you’ve been window shopping — err, door shopping — for Dutch doors, you might have experienced a bit of sticker shock. These often come with a price tag that’s significantly higher than your standard single-panel door. But why the premium cost?
Firstly, the installation process is more complex than that of a regular door. Combine that with the extra hardware required for these dual-purpose doors, and it’s easy to see why they don’t come cheap. Materials, which should be top-notch and durable, and customizations may also weigh considerably on the final price.
While Dutch doors are an investment, the benefits they offer can easily justify the cost for many homeowners. However, if you’re captivated by the charm and utility of Dutch doors but aren’t keen on the price, don’t lose heart. Our next section will delve into the exciting world of DIY Dutch doors — a perfect avenue for those willing to get their hands a little dirty on a truly rewarding project!
How-to Guide: Craft Your DIY Dutch Door
The DIY route not only saves you money but also allows you to put your personal stamp on your home. Creating a Dutch door yourself can be a satisfying experience that combines practicality, creativity, and the joy of accomplishment. Here’s a quick step-by-step guide packed with essential tips to conduct you through the process.
Step 1: Select Your Material
Whether it’s an old door you’re repurposing or a new piece of plywood or reclaimed wood, the first step is choosing the material. Ensure it’s sturdy and free from defects like warping. If you’re going for a rustic look, reclaimed wood is an excellent choice. For a modern aesthetic, plywood or a smooth, pre-finished door slab works wonders.
Step 2: Measure and Cut
After you’ve got your door slab, the next step is measuring and cutting. You’ll need to decide the height of the lower and upper halves of your Dutch door.
The proportions are entirely up to you, but consider how you’ll be using the door most frequently. For instance, if you plan on leaving the top half open more often for better views and ventilation, you might prefer equal halves. However, if you’re keen on maximizing privacy or keeping pets on one side, a taller bottom half might be a better choice.
Use a circular saw for clean cuts, and always remember: measure twice, cut once!
Step 3: Sand and Prep
Once the pieces are cut, sand the edges to smooth out any imperfections. This is also the time to prepare your door for paint or varnish. Depending on your vision, you might opt for a bright color or a natural wood finish.
Step 4: Install Hardware
Before you assemble the door, install the necessary hardware. This includes the knob and a deadbolt for extra security, along with a latch or bolt to lock the panels together. Don’t forget the hinges, two for each half!
Step 5: Paint or Stain
With your hardware in place, paint or stain your door to match your interior or exterior design. Whether you’re opting for a vibrant pop of color or a subdued, classic look, make sure to choose a paint or stain that complements your home.
Step 6: Admire Your Work!
Before you move on to installation, take a moment to admire your handiwork. You’ve just crafted your very own Dutch door! At this point, you’re probably eager to hang it up and start enjoying its benefits. But hold your horses — proper installation is crucial to ensuring that your Dutch door functions as beautifully as it looks.
Dutch Door Installation Tips
So you’ve either crafted your Dutch door or brought home a store-bought beauty — now what? Installation is the final hurdle, and while it might seem straightforward, there are nuances to consider. Here are some installation tips to help you make the process as smooth as possible:
- Check the Frame: Before you even think about hanging your Dutch door, ensure that the door frame is square and sturdy. You might need to do some preparatory work, such as sanding or chiseling, to make the frame ready to welcome your new door.
- Weatherproofing: If you’re installing an exterior Dutch door, weatherproofing is key. Make sure to add weatherstripping around the frame to keep out drafts, rain, and pests. Pay particular attention to the seam between the upper and lower halves, as this can be a common point of air and water leakage.
- Align Carefully: Alignment is crucial. Before fully securing the screws, check that the door opens, closes, and latches smoothly. If it doesn’t, you may need to adjust the door or frame until everything lines up.
- Hardware Matters: Don’t overlook the quality of screws, bolts, and other hardware. You’re going to open that door multiple times every day, so investing in high-quality hardware is a priority.
- A Helping Hand: Installing a Dutch door is a project that can be done on your own, but recruiting an extra pair of hands can make the process a lot smoother. This is especially true when hanging the door and aligning it within the frame.
By following these tips, you’re well on your way to enjoying the practicality and aesthetic appeal that a Dutch door brings to your home!
Do You Need a Dutch Door in Your Home?
You’ve seen their history, their benefits, and even how to craft and install one yourself. Now, the burning question remains: Is a Dutch door right for you?
Perhaps you’re someone who values the simple pleasures of life — a fresh breeze on a warm day, the unobstructed view of a sunset, or the sound of birds singing in the morning. Maybe you’re a parent who wants to keep an eye (and an ear) on the kids while going about your daily tasks. Or perhaps you’re just someone who loves the blend of innovation and tradition, of practicality and aesthetic appeal.
If any of these sentiments resonate with you, then a Dutch door might just be the missing piece in your domestic puzzle! So go ahead, invite one into your home and see how it changes not just your space, but also your daily experience of living.
2Kviews
Share on Facebook
 Dark Mode

 No fees, cancel anytime








11
0