Get Premium
Dark mode theme is available exclusively for premium users. Learn more about the benefits of subscribing.
No fees, cancel anytime.

 Dark Mode Ad-Free Browsing Unlimited Content
 Ad-Free Browsing Unlimited Content Dark Mode
Join 1.2 million Panda readers who get the best art, memes, and fun stories every week!
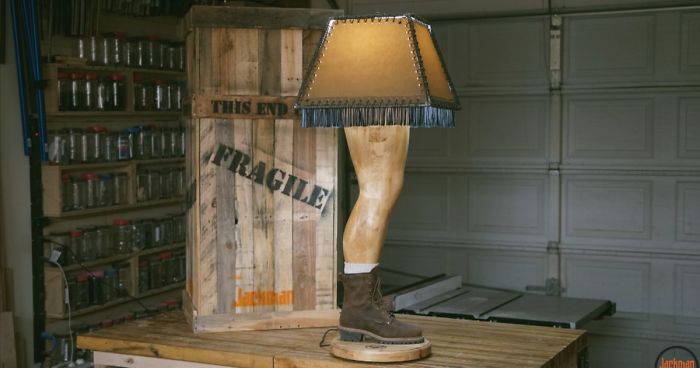
Learn to how build your own (manly) “A Christmas Story” leg lamp by watching this DIY tutorial made by woodworker Jackman Works.
This leg is an exact full scale model of Jackman Works’ own leg. The leg and base are made from maple butcher block scraps from previous projects. The lamp shade is welded from scrap lengths of rebar and wrapped in pleather attached using paracord that looks like Carolina®’s boot laces.
The Carolina® ‘ELM’ Logger boot is attached using a threaded brass lamp rod through the entire leg with a nut on both ends. There are also a couple of screws into the toe of the boot/foot.
More info: jackmanworks.com
He got a photo from all sides and then brought them into GIMP to edit it down to just the silhouette of his leg. Then it was used to make a template and print it out full scale
Maple butcher block for the leg, lamp parts, rebar for the shade, and a log for the fire.
Less material needed towards the bottom of the leg and a few more layers needed for the extra thickness at the top.
I can then use the first piece as a template to trace out the rest of the pieces.
This starts the process of taking off some weight of the leg. Then he spread glue on each layer and made a leg sandwich. The leg is clamped to keep it together.
He marked the lines on both sides, he needed to connect each side in order to establish the shape of the left and ride side of the leg. Then it was time for some power carving
He drew the rough shape to use as a guide.
This allowed him to gain access to the inside of the leg for hollowing.
Then he power carved out the inside of each piece to reduce weight and to establish a route from top to bottom where the wire will run up to the light. Once he was satisfied with the inside, he glued and clamped the 2 halves back together.
He pushed the conduit through the leg to mark the plate so he can drill a hole through to run the wire
He traced out each side of the lamp on his sheet of pleather to get the right shape.
He looped it over and over along the top and bottom of each side panel and then did the same thing running up each of the 4 corners pulling everything nice and tight.
13Kviews
Share on Facebook
I was relieved to learn this was about woodworking rather than taxidermy.
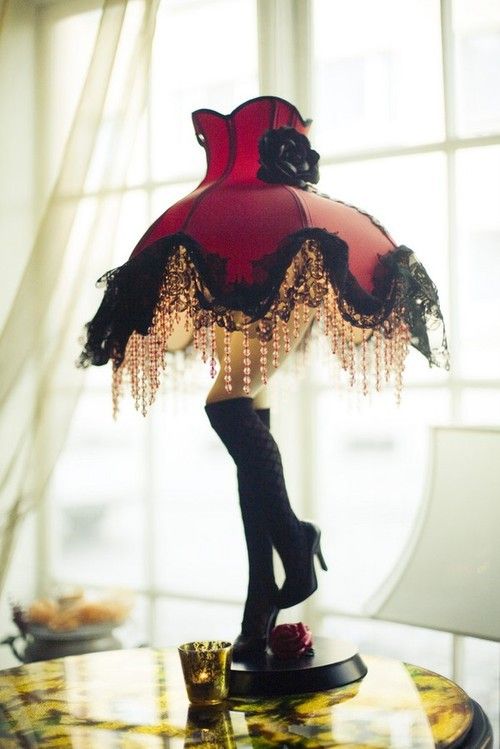
I feel like the lampshade should look more like a kilt to look truly manly. I know the movie version has the fringe, but as long as we're going manly here, um what kind of men's garment looks like that with the fringe?
Yes a kilt shade would make this amazing! A la Jamie Fraser from Outlander for me please! hahaha
Load More Replies...Guy at a pub asked why I was looking at him in a strange way. "I am trying to imagine what you would look like as a standard lamp" He thinks I'm weird. His band mates loved how I was the only female not drooling over him (his comments to other females caused me to think of a use for a nice body without his brain getting in the way)
I was relieved to learn this was about woodworking rather than taxidermy.
I feel like the lampshade should look more like a kilt to look truly manly. I know the movie version has the fringe, but as long as we're going manly here, um what kind of men's garment looks like that with the fringe?
Yes a kilt shade would make this amazing! A la Jamie Fraser from Outlander for me please! hahaha
Load More Replies...Guy at a pub asked why I was looking at him in a strange way. "I am trying to imagine what you would look like as a standard lamp" He thinks I'm weird. His band mates loved how I was the only female not drooling over him (his comments to other females caused me to think of a use for a nice body without his brain getting in the way)


 No fees, cancel anytime


118
19