Get Premium
Dark mode theme is available exclusively for premium users. Learn more about the benefits of subscribing.
No fees, cancel anytime.

 Dark Mode Ad-Free Browsing Unlimited Content
 Ad-Free Browsing Unlimited Content Dark Mode
Join 1.2 million Panda readers who get the best art, memes, and fun stories every week!
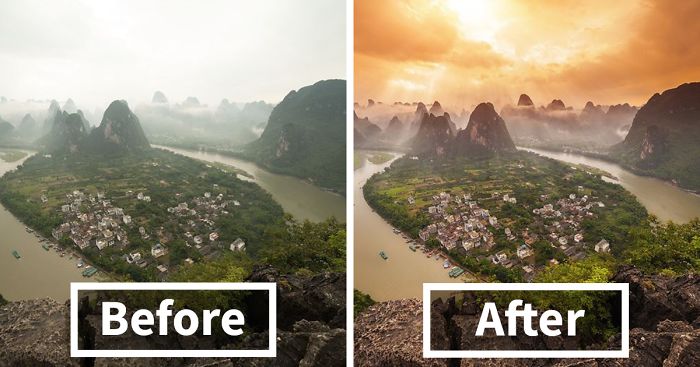
Taking a good picture isn't easy. Taking an awesome picture is even harder. And taking an impossible picture is, well, impossible. Unless you use Photoshop that is.
Peter Stewart is an internationally published photographer with thousands of followers and millions of views. He's also a wizard with Photoshop, and you can see from these revealing before and after pictures just what sort of difference some clever editing can make.
“I like to approach my digital photography with a certain sense of the fantastical and the surreal,” Stewart told PetaPixel. He uses a technique called bracketed multiple exposure, which allows him to retain highlight details from different photographs before stacking them together into one picture.
“These before and after samples are simply meant to highlight what can be done with the power of Photoshop,' says Stewart. "As such, I have deliberately provided the most dramatic examples.”
More info: Peter Stewart | 500px | Instagram | Flicker (h/t: demilked, PetaPixel)
This post may include affiliate links.
This is the only one I like, as it still looks real. The others are over manipulated and just scream "photoshop", which in my mind, then totally takes away from the photo.
i can vaguely see mt Fugi in the first two exposures, however the final image looks very photoshopped. Like the mountain was popped in from a completely different image. That's not what you want in most final images .
This is an HDR image. All 3 images are combined. Its a very common technique for photographers who cant afford Gradiated filters.
Load More Replies...That's a nice merge. HDR was sooo overcooked when it first appeared
Too unreal, the mountain in the distance should be less visible due to atmospheric haze.
So many people who just can't handle an imaginative mind showing people a world brighter than what we generally get to see.
You should go to Ireland, the trees are sometimes ACTUALLY that shade of green!!!
Load More Replies...What is Fuji-san doing in Kyoto??? O.o Could at least have studied a bit geography...
Ops, my mistake, it is actually a pagoda in Fuji Five lakes, but Fuji-san really looks digitally added there.
Load More Replies...Kodachrome They give us those nice bright colors They give us the greens of summers Makes you think all the world’s A sunny day, oh yeah
the cloud image does not follow the light source and coloring of the building and jungle.
Some of the photo's look better in their natural state, and others not so much.

a camera will never capture how you really see it and how you feel about it
Indeed. So there we have image editing programs to help us achieve the feeling. Nothing wrong with that. Just artistic photography.
Load More Replies...This article seems to be implying that professional photographers and "online pictures" are largely all so good, because they use bracketing and HDR. Maybe it's because this process appears more manual, and therefore more skillful. There's a reason you don't see this type of work in National Geographic for example. 20 years ago there were special categories in photography magazines for manipulated photos, mainly to showcase new techniques just for what they're worth. In my mind that's where these photos should stay. Secondly, these are very standard tourist shots and angles. The real essence of photography, timing and framing, is lost completely to what is basically saturation. This is kind of teaching the people of the internet to think that all the real skill is in post-production, when that is in fact a completely separate issue for serious pros. The great photos of the world are not photoshopped in any way, and that's what makes them good.
I quite agree with your assessment, "badly printed postcards", or standard magazine add fare, and already forgotten. No waiting for the light, no thousand shots for the one, no freezing in -30 or out at 3:00 am. Just grab some images and do what you can with them.
Load More Replies...It's photographer's desicion how they would want to present their images. That's why there are different styles and different people. Nobody can force you to like something that you don't but you can't say what is right and what is wrong. It's a matter of choise.
I often hear or read about people saying "of course. They used photoshop." If someone thinks photography is easy, try it. If someone thinks editing is easy, I dare you. A crappy photo will always be a crappy photo. In most of the cases the post processing is possible because the photographer knew how to take the photo in a way that they would have all they needed to work with and give it the look they want. Things aren't that simple. And if you find articles like this as an excuse and say "sure the photos are better than mine but I don't process them", then go for it. Try and see. No excuses. These photos take some really hard work to end up looking like this. It's not cheating. It's actually harder! Oof. Sorry.
Some turned out to be quite good.. Not the composites though.. Few were highley manipulated which doesnt seem right.. At the end of the day, photographers are not ppl who have to document their visits to places, but produce some selable images.. But overdoing the manipulation is also a sin to the photography religion!!
And when you get really good images without such post production, most of people think it's photoshopped only, that's sad but reality
Load More Replies...In the old days of course there wasn't such a thing as photoshop. The photographers used to burn and dodge in the darkroom to get the images they wanted, ooooh just like using photoshop in fact. Different times and different skills, however the common theme is Somebody had to compose and take the shot in the first place.
So many people complaining about the quality of the modified versions - it appears nobody read the opening text: “These before and after samples are simply meant to highlight what can be done with the power of Photoshop,' says Stewart. "As such, I have deliberately provided the most dramatic examples.”
Still takes mad skills to be a pro photographer...post production used to happen in the darkroom, now it's on a screen.
Wow! Very interesting thread. Thank you for the insight because I never knew pictures were that photoshopped! It's amazing what technology
Some pictures are, by far the majority aren't.
Load More Replies...I admit there are sometimes that photoshop is needed, like to brighten a darker picture or darken a too bright picture but I believe there is such a thing as too much photoshop.
Purists versus creative freedom discussions. lovely! Personally I think photography is an art that is about capturing reality. That is it's essence. If you decide that you want to create an expression of art with a medium like a camera that is about altering reality, you should be more creative than simply enhance this reality with more vibrant colors or a stunning background. Because that is not art, it is simply a tool you use to trick someone into believing something is prettier than it actually is. There could be nothing wrong with that if that is what you like doing or looking at....proving you are not trying to sell me a ticket to a holiday location with this....art.
I like the real ones. You can tell from the plane that they are photoshoped!
I don't think there's really anything wrong with this type of photoshop. I mean, it's another format of art and creativity. It encourages people to go out and explore the beautiful world. The images are pretty great even before the manipulations but, like painting a picture, photo shopping your photographs is another form of personal expression and creativity. You're not going to bash someone for not painting a realistic picture exactly how it looks, right? If you still don't belive me, pick up your camera, go take a photo, and try to make it look as awesome as these. It's not always as easy as you think.
Its a digital photography, so dont be suprised. This techiques allows photographes create stuning images and be more flexible with digital format. With film old times you havent had so much freedom in editing.. you was more pro if you capture moment once.. this is pro by editing :-)
And the 10th was the reason I waited til dark in garden by the bay. To get that amazing shot. Apparently that amazing shot never happened.
Thanks so much Julija I needed that I was starting to feel most depressed my photos are never as good as the online ones the ones I see on instagram now I know why Thanks a million.
That may not be the reason. If you study enough you'll get the results you want.
Load More Replies...a camera will never capture how you really see it and how you feel about it
Indeed. So there we have image editing programs to help us achieve the feeling. Nothing wrong with that. Just artistic photography.
Load More Replies...This article seems to be implying that professional photographers and "online pictures" are largely all so good, because they use bracketing and HDR. Maybe it's because this process appears more manual, and therefore more skillful. There's a reason you don't see this type of work in National Geographic for example. 20 years ago there were special categories in photography magazines for manipulated photos, mainly to showcase new techniques just for what they're worth. In my mind that's where these photos should stay. Secondly, these are very standard tourist shots and angles. The real essence of photography, timing and framing, is lost completely to what is basically saturation. This is kind of teaching the people of the internet to think that all the real skill is in post-production, when that is in fact a completely separate issue for serious pros. The great photos of the world are not photoshopped in any way, and that's what makes them good.
I quite agree with your assessment, "badly printed postcards", or standard magazine add fare, and already forgotten. No waiting for the light, no thousand shots for the one, no freezing in -30 or out at 3:00 am. Just grab some images and do what you can with them.
Load More Replies...It's photographer's desicion how they would want to present their images. That's why there are different styles and different people. Nobody can force you to like something that you don't but you can't say what is right and what is wrong. It's a matter of choise.
I often hear or read about people saying "of course. They used photoshop." If someone thinks photography is easy, try it. If someone thinks editing is easy, I dare you. A crappy photo will always be a crappy photo. In most of the cases the post processing is possible because the photographer knew how to take the photo in a way that they would have all they needed to work with and give it the look they want. Things aren't that simple. And if you find articles like this as an excuse and say "sure the photos are better than mine but I don't process them", then go for it. Try and see. No excuses. These photos take some really hard work to end up looking like this. It's not cheating. It's actually harder! Oof. Sorry.
Some turned out to be quite good.. Not the composites though.. Few were highley manipulated which doesnt seem right.. At the end of the day, photographers are not ppl who have to document their visits to places, but produce some selable images.. But overdoing the manipulation is also a sin to the photography religion!!
And when you get really good images without such post production, most of people think it's photoshopped only, that's sad but reality
Load More Replies...In the old days of course there wasn't such a thing as photoshop. The photographers used to burn and dodge in the darkroom to get the images they wanted, ooooh just like using photoshop in fact. Different times and different skills, however the common theme is Somebody had to compose and take the shot in the first place.
So many people complaining about the quality of the modified versions - it appears nobody read the opening text: “These before and after samples are simply meant to highlight what can be done with the power of Photoshop,' says Stewart. "As such, I have deliberately provided the most dramatic examples.”
Still takes mad skills to be a pro photographer...post production used to happen in the darkroom, now it's on a screen.
Wow! Very interesting thread. Thank you for the insight because I never knew pictures were that photoshopped! It's amazing what technology
Some pictures are, by far the majority aren't.
Load More Replies...I admit there are sometimes that photoshop is needed, like to brighten a darker picture or darken a too bright picture but I believe there is such a thing as too much photoshop.
Purists versus creative freedom discussions. lovely! Personally I think photography is an art that is about capturing reality. That is it's essence. If you decide that you want to create an expression of art with a medium like a camera that is about altering reality, you should be more creative than simply enhance this reality with more vibrant colors or a stunning background. Because that is not art, it is simply a tool you use to trick someone into believing something is prettier than it actually is. There could be nothing wrong with that if that is what you like doing or looking at....proving you are not trying to sell me a ticket to a holiday location with this....art.
I like the real ones. You can tell from the plane that they are photoshoped!
I don't think there's really anything wrong with this type of photoshop. I mean, it's another format of art and creativity. It encourages people to go out and explore the beautiful world. The images are pretty great even before the manipulations but, like painting a picture, photo shopping your photographs is another form of personal expression and creativity. You're not going to bash someone for not painting a realistic picture exactly how it looks, right? If you still don't belive me, pick up your camera, go take a photo, and try to make it look as awesome as these. It's not always as easy as you think.
Its a digital photography, so dont be suprised. This techiques allows photographes create stuning images and be more flexible with digital format. With film old times you havent had so much freedom in editing.. you was more pro if you capture moment once.. this is pro by editing :-)
And the 10th was the reason I waited til dark in garden by the bay. To get that amazing shot. Apparently that amazing shot never happened.
Thanks so much Julija I needed that I was starting to feel most depressed my photos are never as good as the online ones the ones I see on instagram now I know why Thanks a million.
That may not be the reason. If you study enough you'll get the results you want.
Load More Replies...


 No fees, cancel anytime