Every child is an artist. I have heard a lot of people coming to me to say “I used to draw well”. Used to? Our lives put us through a plethora of unexpected twists and turns, marriage, family, children, healthcare, education which leads to a tight financial situation and we are all tethered to it one way or the other. I have been practicing art for a while say for about 9 years now. Luckily, I had a very supportive family and they gifted me with a congenial environment to practice art. Isn’t it a gift to have a very cozy and supportive environment to practice art? Of course, yes! And I did practice and I did it very well and my hardwork fetched me a state and a national award. Through the process I also learnt how to monetise through my talent.
If you used to practice art and somehow lost touch then this article is for you. Here I have given a step by step explanation of the process of portrait drawing. Is it going to easy, a little easy! Is it going to be difficult, no it certainly is not that difficult. I am going to ease you through the process. Shall we get into it ?
More info: ramyasadasivam.com
Let us break the ice…
Step 1 – Structure is the key!
You would have heard comments such as she has a long face, she has an oval face, a round face, an elongated face, chubby face, short face, well go by it. Trust your judgement, stick to it, construct your structure, give it an outline first. Give your portrait a shape first.
Step 2 – Placement of features
Vertical measurement of the features is the key to your portrait. By vertical measurement I mean, the vertical length of the nose, eyes, forehead, chin and even the face. How do we measure it visually, well it is something that only comes out of practice. If you think your character has a lengthy forehead, chin, face or nose, just trust your judgement and go by it.
Step 3 – Our first layer of reference
Skin is a beautiful creation under which we have blood, flesh, veins and several other chemicals underneath it to keep us alive and functioning. These beautiful ingredients make our skin completely magical, magical enough to reflect light that falls on it. A good painting is a right amount of balance between the lowest value (where the skin reflects light) and the darkest value which could be a shadow or a depression. This is the same formula we apply for a portrait.
Step 4 – Value building and hair
We are going to build layer over layer with the first layer as our reference. Gradually build layers so we do not overdo the values. A dark streak on the cheek is not desirable on a face isn’t it? When it comes to hair, there is always a pattern. Observe the pattern and try to reproduce it. This can be done only with the use of kneadable eraser. Select a mid-tone value, apply it through out the hair, strengthen the values wherever required and after which go back and forth with your kneadable eraser so you get a natural pattern of the hair
Step 5 – Soul your portrait up with highlight
A drawing/ painting does not get the life it deserves without a highlight. A highlight is something that is done using an ordinary eraser and a kneading eraser. A kneading eraser can create several values on a drawing. Nose, forehead, lips, cheeks, chin are usually the features that may need highlight in a portrait.
Video tutorial of portrait drawing
I have covered as much as possible in this post. However, this is just a start. If you would like to learn more about face drawing, perfect your portraits, learn the nuances of a face drawing, click on this link given below. The topics that are covered in the video tutorial are mentioned there. Just a take a look at the chapters 😊
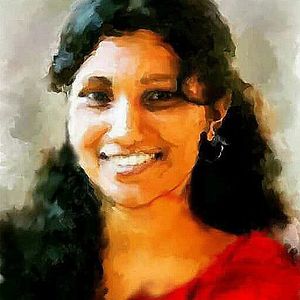
Image credits: ramyasadasivam.com
546views
Share on FacebookThis is probably the worst advice for beginners about drawing a portrait.
Um..yeah, this isn’t how you structure a portrait drawing at all
Load More Replies...This is probably the worst advice for beginners about drawing a portrait.
Um..yeah, this isn’t how you structure a portrait drawing at all
Load More Replies...
 Dark Mode

 No fees, cancel anytime


















13
2